
In this article
A $400 graphite rod rarely breaks when fighting a trophy fish. It breaks silently in the corner of a dark garage, crushed by a falling broom or warped by gravity over a long winter.
I have spent decades on the water, guiding clients and managing my own quiver of equipment. The most heartbreaking moments aren’t the fish we lose at the boat, but the gear we realize is ruined before we even make the first cast. The modern fishing rod is a marvel of composite engineering, yet 99% of its life is spent in static vulnerability. Most anglers treat fishing rod storage as an afterthought, relying on cheap plastic clips that scratch the finish or 5-gallon buckets that crush guides.
True outdoor competence isn’t just about catching fish; it is about fishing gear preservation. In this step-by-step build tutorial, we are moving beyond simple storage. We act as engineers rather than just carpenters. We will apply specific principles—gravity, friction, and materials science—to build three preservation systems that protect your investment for a lifetime. Whether you are cost-conscious looking for a build under $25 or wanting a premium aesthetic display, these plans cover the utility layer, material layer, and location layer of your workspace.
Why Do Factory Racks Fail Your Gear? (The Engineering Context)
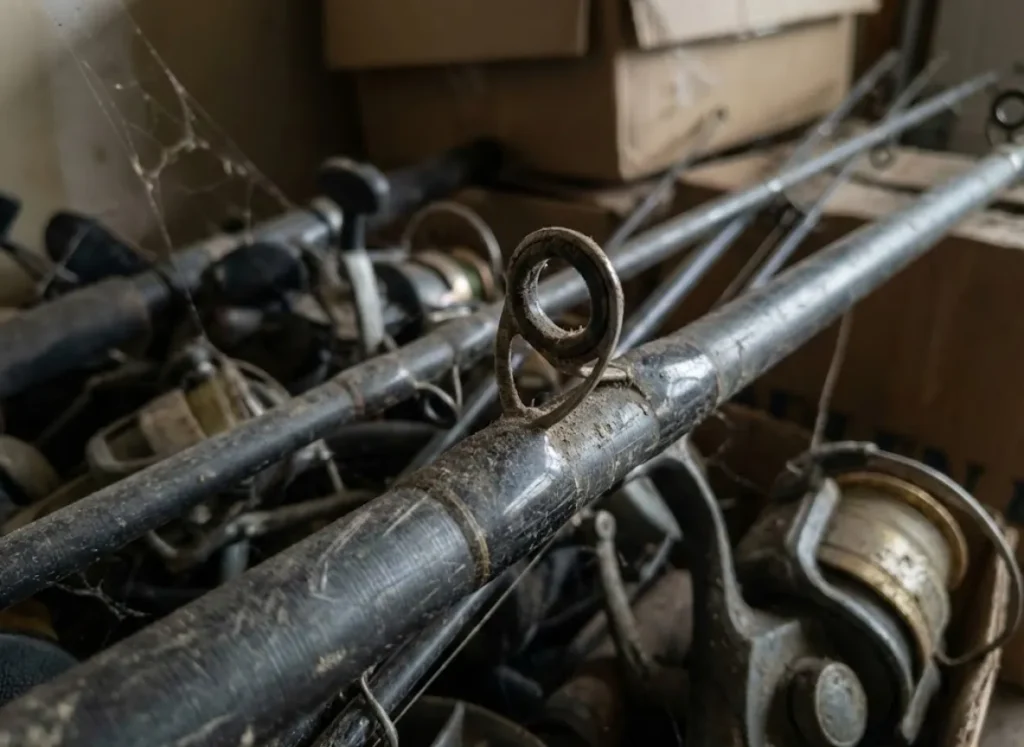
To build a better fishing rod holder, you must first understand the invisible forces trying to destroy your equipment. Generic rod rack ideas often fail because they treat rods as rigid sticks rather than the precision instruments they are.
What is “Creep” and How Does it Ruin Rod Action?
Rod blanks act as tapered flexible beams designed for dynamic loading—bending and recovering while fighting a fish. However, they are highly susceptible to static deformation. “Creep” occurs when the viscoelastic behavior of polymer matrix composites in the rod blank slowly relaxes under a constant load, such as leaning against a wall for months.
Over time, this results in a permanent “set” or bend in the rod tip. This misaligns the rod’s spine and destroys casting accuracy. The engineering solution to creep is strict verticality. By storing the fishing pole straight up and down, we use gravity to align the rod’s mass with its central anatomy of the fishing rod. If a vertical fishing rod setup isn’t an option, proper DIY designs must utilize multi-point support systems (minimum 3 points) to minimize span lengths and neutralize these deformation forces.
Why Are Ceramic Guides the Silent Killer of Fishing Line?
While the blank suffers from warping, the guides face a more brittle threat. Modern guides use inserts made of Aluminum Oxide or Silicon Carbide. These materials possess extreme hardness but low fracture toughness of advanced ceramics.
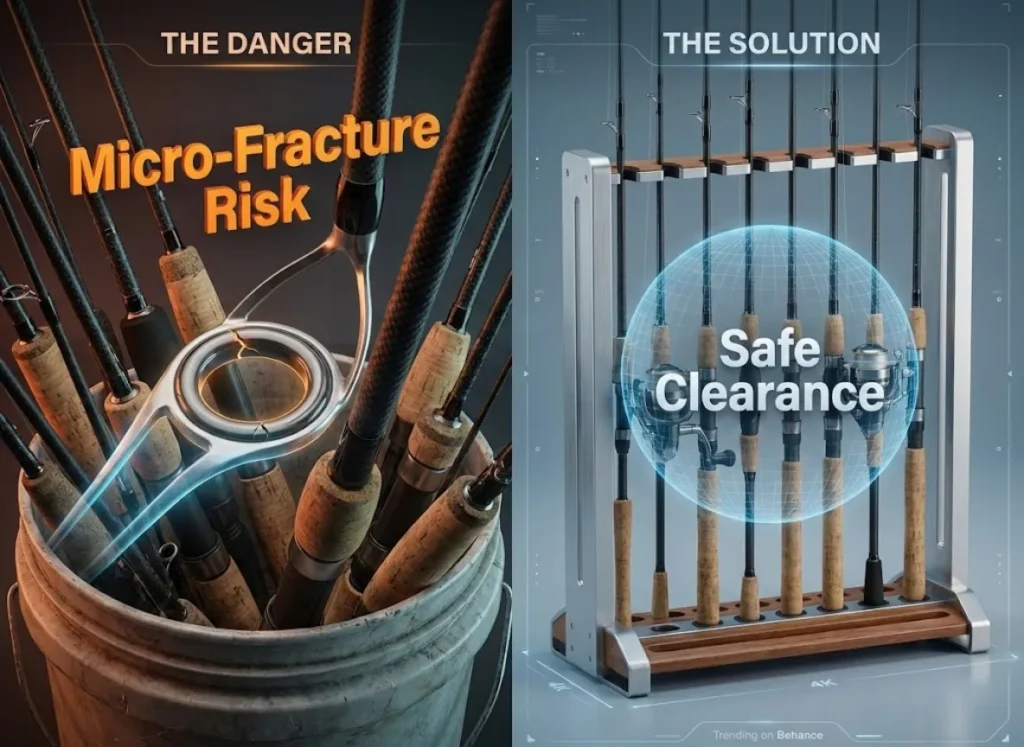
When fishing rods are bunched together in a bucket or corner, the metal frame of one guide strikes the ceramic ring of another. This “clatter” often creates microscopic hairline fractures that are invisible to the naked eye but razor-sharp to tensioned fishing line. A custom rod rack is the only way to enforce strict lateral separation between combos to prevent this metal-on-ceramic contact. Your build must account for the widest point of the spinning reels to ensure clearance. This effectively soundproofs your storage; if you don’t hear the “clink,” your guides are safe.
Pro-Tip: Run a cotton swab (Q-tip) around the inside of your ceramic guides once a season. If the cotton snags, you have a micro-fracture that will cut your line, and the guide must be replaced.
Plan A: The “Angler’s Gallery” – How Do You Build a Vertical Wood Rack?
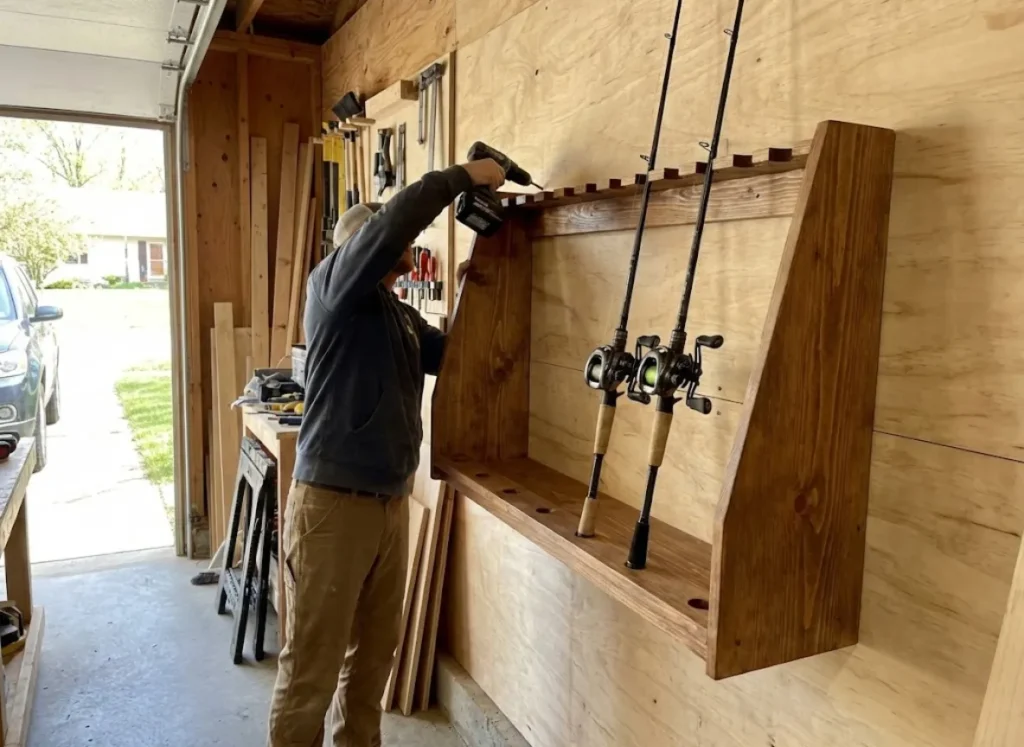
For the finished garage or “man cave,” a weekend warrior wall mount balances aesthetic warmth with structural rigidity. This design relies on geometry, not clamps, to hold the poles in place.
What Materials Are Best for Stability and Aesthetics?
Wood selection is critical because lumber is hygroscopic. It absorbs moisture from humid garage environments and expands according to the equilibrium moisture content of wood. Softwoods like pine planks or standard 1×4 boards are budget-friendly but must be sealed with wood stain, boiled linseed oil, or varnish to prevent warping or cupping that could misalign the rod slots.
For a more durable hardwood finish, 1×3 oak planks offer superior rigidity and dent resistance but require pilot holes to prevent splitting. Regardless of whether you choose wood vs pvc, you must create a “Soft Interface.” Raw wood is harder than a rod’s clear coat and will abrade the finish over time. Integrate adhesive-backed felt strips or closed-cell EVA foam into the cups and slots. This protects the finish and fits the ethos of budget fishing gear—maximizing value by preserving what you own. A pocket hole jig is recommended for attaching the 1×6 boards (shelves) to the supports, hiding fasteners for a furniture-grade appearance.
Material Selection Guide
Compare cost, durability, and aesthetic qualities of common build materials.
Durability
Moderate. Susceptible to warping or cupping if not properly sealed; hygroscopic nature absorbs moisture.
Aesthetic
High. Offers a warm, natural look. Versatile surface that can be easily stained or painted.
Durability
High. Superior rigidity and dent resistance. Very stable material suitable for long-term use.
Aesthetic
Very High. Provides a furniture-grade appearance with a premium finish.
Durability
High. Waterproof and rot-proof. Immune to humidity changes, making it ideal for damp environments.
Aesthetic
Low. Has a utilitarian, industrial “plumbing” look. Difficult to disguise.
Durability
Very High. Extremely strong, heavy-duty, and long-lasting.
Aesthetic
Moderate to High. Offers a sleek, modern, or industrial look depending on the finish.
Why is the 15-Degree Drill Angle Critical for Retention?
Drilling holes at a 90-degree angle creates an unstable equilibrium. A simple vibration from a closing door can cause rod butts to slip and tips to fall. The “Angler’s Gallery” design requires drilling the bottom cups and top slots at a specific 15-degree angle toward the wall.
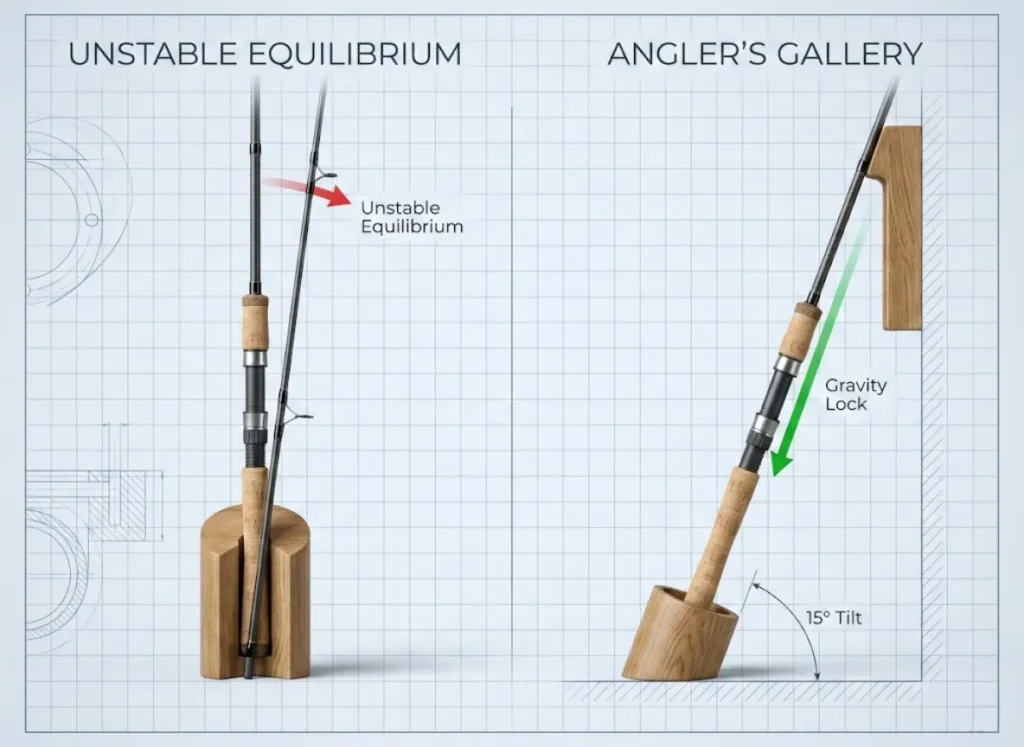
This geometry shifts the rod’s static stability and center of gravity backward. It uses the rod’s own mass to lock it securely against the back of the slot. To achieve this, fabricate a simple 15-degree wedge jig from scrap 2×4 lumber to guide your power drill or tilt your drill press table. For the top shelf, drill the angled holes first using a forstner bit or 24mm spade bit for a flat bottom, then use a jigsaw to cut the “U” shaped entry path. This gravity-lock eliminates the need for mechanical latches, maintaining a clean look.
Plan B: The “Mobile Arsenal” – How Do You Fabricate a Wash-Down PVC Cart?
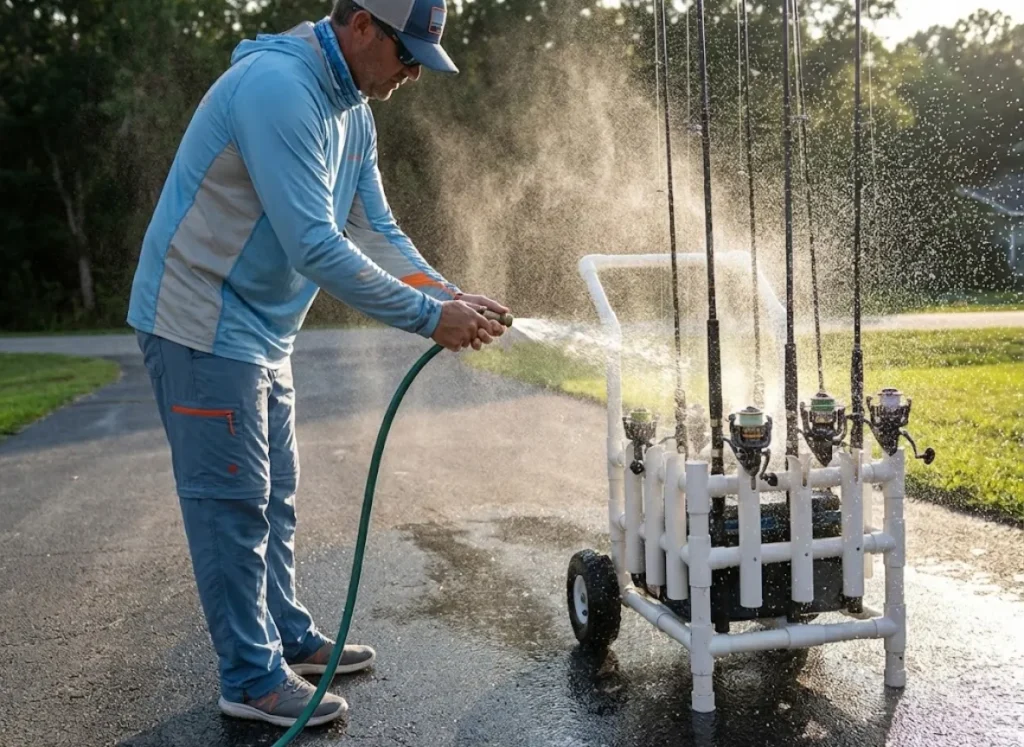
If you have a large collection or need to wash down saltwater vs freshwater gear after a trip, wood is insufficient. You need an industrial, freestanding cart.
Why is Schedule 40 PVC the Standard for Marine Storage?
Polyvinyl Chloride (PVC) provides a rot-resistant, chemically resistant framework ideal for exposure to salt spray and hose water. Standard Schedule 40 (white plumbing pipe) in 1-1/2 inch PVC pipe diameter is the “Goldilocks” size. It is large enough for surf rod butts but small enough to keep bass rods upright.
Builders must be aware that UV radiation can degrade the polymer structure. According to the effect of UV radiation on PVC pipe properties, standard PVC will become brittle in sunlight. You must paint the rack with plastic-bonding paint (like Krylon Fusion) if it will live outside or near windows. Assembly relies on solvent welding—using PVC cement and PVC glue—to chemically fuse the PVC T-connectors and PVC 90-degree elbows into a monolithic structure. Remember to sand or heat-flare the cut edges of the PVC to prevent scratching your reel stems.
How Does “Ballast Engineering” Prevent Cart Tipping?
A common failure of tall, narrow high-capacity garage carts is tipping over in high winds. The frame is significantly lighter than the 20+ rods it holds, raising the center of gravity dangerously high.
The engineering fix is found in the principles of stability and ballast. Before sealing the bottom rectangular frame, fill the pipes with dry play sand. This adds 20-30 lbs of “dead weight” at the lowest possible point, acting as an anchor.
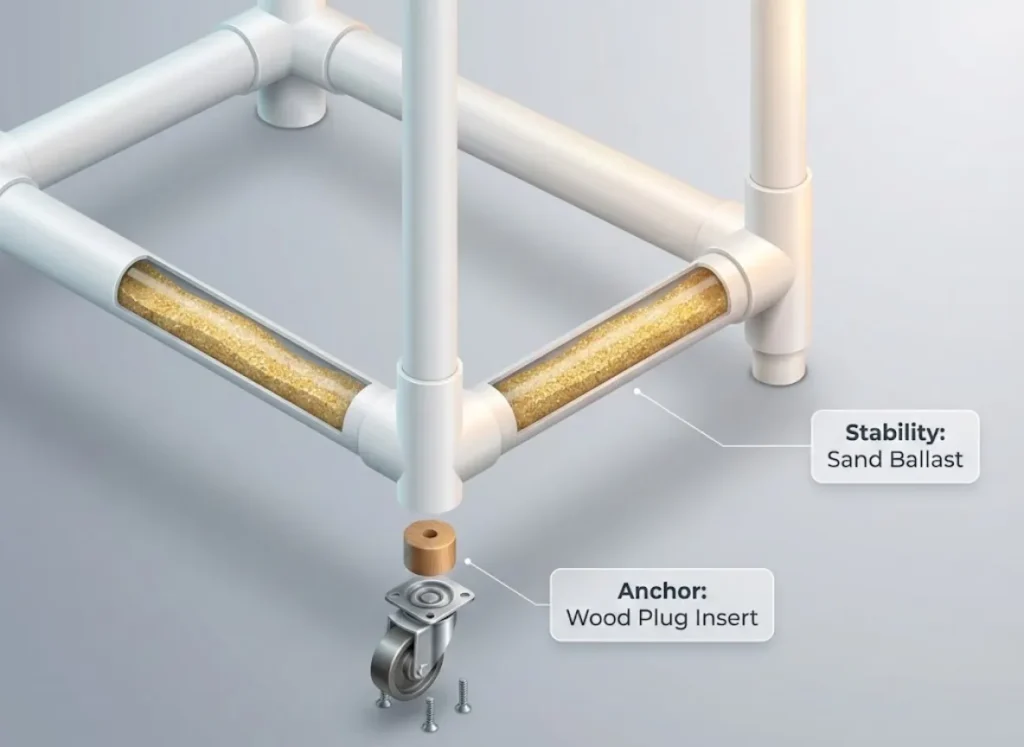
For mobility, standard PVC caps don’t hold caster screws well. The superior method uses “plug inserts”—wood blocks turned down to fit inside the PVC legs. This provides a solid substrate for screwing in heavy-duty casters. This transforms a flimsy rack into a stable, mobile rack that pairs perfectly with a highly organized best fishing tackle box.
Plan C: The “Overhead Vault” – How Do You Safely Utilize Ceiling Space?
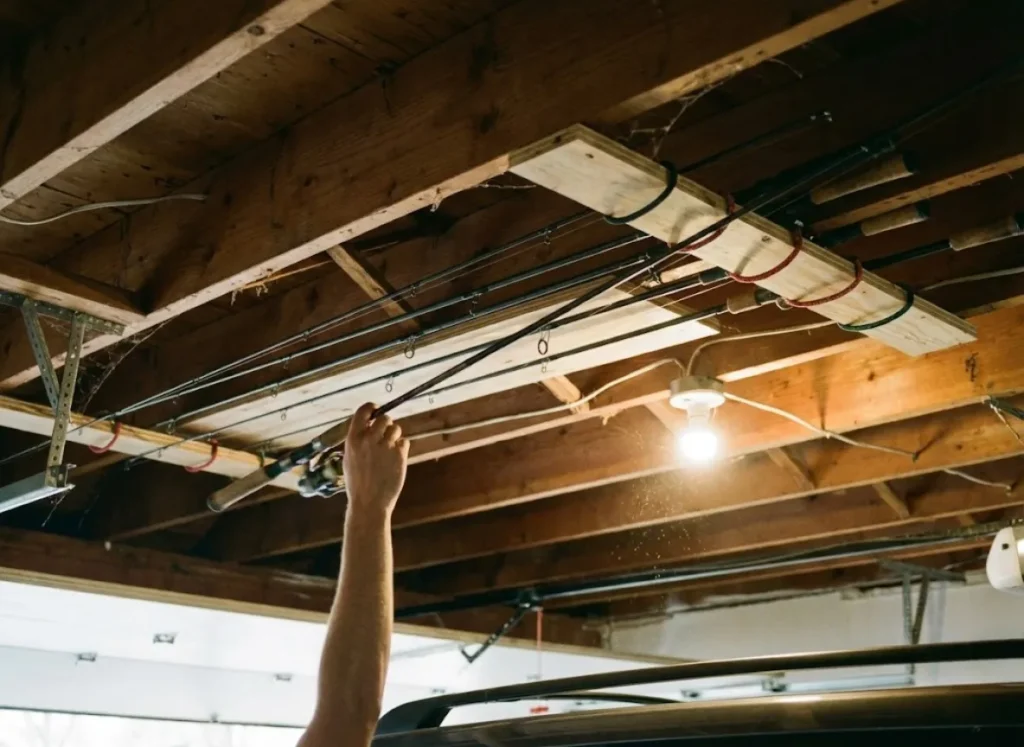
When floor space is at a premium, we must look upward. The final frontier of gear storage is the dead space of the garage ceiling, but this requires careful calculation to avoid damaging the fishing poles.
How Do You Calculate Support Spans to Prevent Blank Sag?
Gravity exerts a constant downward pull when you store fishing rods horizontally. Supporting them only at the extreme ends (tip and handle) guarantees a permanent “belly.” The support plan must utilize a “Three-Point System” or at least shift the supports inward. Place one support at the handle and one near the mid-section ferrule, rather than the tip.
Anchoring is non-negotiable. Fasteners like 2-inch drywall screws are insufficient; you must use trim head screws that penetrate at least 1.5 inches into ceiling joists. Given the impact of vibration on structural fasteners, you should never rely on drywall anchors for overhead loads. Use the “Alternating Layout” (Tip-to-Butt) to maximize width, allowing bulky reels to nest next to the slender rod tips of adjacent rods. This ensures you can fit your best rod and reel combos without handles colliding.
What Mechanisms Ensure Active Retention Above Your Vehicle?
Unlike wall-mounted fishing racks that use gravity to seat the rod, a space-saver ceiling rack fights gravity. A simple bump can dislodge a rod, sending it crashing onto a vehicle hood. Active retention is mandatory.
Install screw eyes at the ends of the rack and stretch a marine-grade shock cord (bungee) across the opening of the J-hooks. This creates a flexible barrier that prevents vertical movement but allows for quick retrieval. For higher security during long-term storage, such as winter trout fishing off-seasons, consider a “Rotating Bar.” Drill holes through the tips of your plywood J-brackets and insert a long wooden dowel pin or metal rod to close the “J” into an “O.” Secure this with a cotter pin. This functions as a simple mechanical locking mechanism, ensuring expensive fishing tackle remains suspended regardless of garage door vibrations.
Pro-Tip: When mounting an overhead rack, always measure the clearance with the garage door in the open position first. The “crush zone” between the top of the open door and the ceiling is a common place for rod tips to snap.
Conclusion
We spend hours researching drag systems and gear ratios, yet we often ignore the physics of storage. To prevent resin creep, vertical rod holders (Plan A) are the gold standard. To save your guides from micro-fractures, strict lateral separation is required. And if you build with PVC, ballast is the key to stability.
Don’t wait for a broken tip to upgrade your fishing storage ideas. This is a perfect weekend project requiring no woodworking skills needed beyond the basics. Download a cut sheet, grab your tape measure and carpenter’s square, and head to the hardware store. Build a system that respects the investment you’ve made in your passion.
FAQ – Frequently Asked Questions
How far apart should I space the holes for my fishing rod rack?
For standard freshwater gear, 4 inches on center is sufficient. However, saltwater and offshore reels require 5 to 6 inches to prevent handles from colliding. Always measure your widest reel before drilling.
Can I store my fishing rods horizontally without damaging them?
Yes, but only if you support the rod at multiple points (at least three) to prevent the blank from sagging under its own weight. Avoid supporting the pole solely by the tip and handle.
What size hole saw do I need for a fishing rod rack?
A 1-3/4 inch hole saw or 2 inch hole saw is ideal for the butt cups (bottom shelf). A 44mm hole saw or smaller 1-inch bit works best for the upper slot (top shelf).
How do I stop my PVC rod rack from falling over?
PVC is very light, so you must add ballast. Fill the bottom horizontal pipes of the base frame with dry sand or gravel. This lowers the center of gravity and provides stability against wind or bumps.
Risk Disclaimer: Fishing, boating, and all related outdoor activities involve inherent risks that
can lead to injury. The information provided on Master Fishing Mag is for educational and informational purposes
only. While we strive for accuracy, the information, techniques, and advice on gear and safety are not a substitute
for your own best judgment, local knowledge, and adherence to official regulations. Fishing regulations, including
seasons, size limits, and species restrictions, change frequently and vary by location. Always consult the latest
official regulations from your local fish and wildlife agency before heading out. Proper handling of hooks, knives,
and other sharp equipment is essential for safety. Furthermore, be aware of local fish consumption advisories. By
using this website, you agree that you are solely responsible for your own safety and for complying with all
applicable laws. Any reliance you place on our content is strictly at your own risk. Master Fishing Mag and its
authors will not be held liable for any injury, damage, or loss sustained in connection with the use of the
information herein.
Affiliate Disclosure: We are a participant in the Amazon Services LLC Associates Program, an
affiliate advertising program designed to provide a means for us to earn advertising fees by advertising and linking
to Amazon.com. As an Amazon Associate, we earn from qualifying purchases. We also participate in other affiliate
programs and may receive a commission on products purchased through our links, at no extra cost to you. Additional
terms are found in the terms of service.